Oracle Identity & Access Management Domain Environment Setup
Environment : VirtualBox – OEL 6.5 + Docs to configure.
70 GB HDD – 16GB RAM – i3 2nd Gen Processor
2 users – oracle, weblogic
/stage – all products unzipped
/d01 – empty, install all IDM products
/u01 – empty, install only DB
Pre-req : https://www.youtube.com/watch?v=sbVIEQgrU2k
Oracle Identity And Access Management 11.1.2.2
A) Installation : 10+ products 3-4 days #Bible for installation is certification matrix
Right Version, how to install?
1. DB 11.2.0.1- Install, Create, Tune and create listener
A) Install the DB
#xhost + #enale the x session
su – oracle
cd /stage/database
./runInstaller
B) Create the DB
#xhost + #enale the x session
su – oracle
dbca
C) Create Listener
#xhost + #enale the x session
su – oracle
netca
D) Tune the DB – 4 parameters are mandatory
1. open_cursors : 1000
2. processes : 1000
3. sessions : 1000+
4. DB Character Set : AL32UTF8
SQL> alter system set open_cursors=1500 scope=spfile; #
2 docs : performance tuning docs for OIM/OAM – N/W, OS, DB, ApplicationServer, OIM/OAM
Checkpoint : DB is ready for RCU
2. RCU 11.1.2.1 #sys/Oracle123
Pre-req : DB + Listener must be up and running.
-> RCU creates DB schemas for FMW products
-> Schema is a DB User or its a collection of DB Objects(table, Seq, SP, Func, etc..)
#xhost +
su – oracle
cd /stage/rcu11.1.2.2/rcuHome/bin/
./rcu
Select 3 Components :
OID : ODS – ODSSM(ODSM)
OIM : DEV_OIM, DEV_MDS, DEV_OPSS, DEV_SOAINFRA, DEV_ORASDPM
OAM : DEV_OAM, DEV_IAU
Checkpoint : DB is ready with all schema and can be integrated with OIM/OAM …
3. weblogic 10.3.6(wls1036_generic.jar – 32bit JDK -Sun JDK, Jorockt JDK, Limitation – 4 GB of JVM Heap Size) using
custom JDK 1.6 update35+(64 bit JDK – Sun, Jrockt, 32 GB JVM Heap Size)
#xhost
su – weblogic
cd /stage
export JAVA_HOME=/stage/jdk1.6.0_35/
export PATH=$JAVA_HOME/bin:$PATH
java -version
which java
java -jar wls1036_generic.jar
4. SOA SUite 11.1.1.7
#xhost
su – weblogic
cd /stage/soa11.1.1.7/Disk1
./runInstaller
/stage/jdk1.6.0_35/
oracle_common : reference of all products.
Oracle_SOA1
Oracle BPEL PM, Mediator, Rules, B2B, Human Workflow
Oracle Business Activity Monitoring (BAM)
Oracle Enterprise Manager
Install 11 interim Patches on SOA SUite, required for OIM
Note : the patches bundle will be available in iamSuite.
cd /stage/iamSuite11.1.2.2/Disk1
ls OIM_11.1.2.2_SOAPS6_PREREQS.zip
mkdir -p /stage/SOA_INTERIM_PATCHES
unzip -d /stage/SOA_INTERIM_PATCHES OIM_11.1.2.2_SOAPS6_PREREQS.zip
cd /stage/SOA_INTERIM_PATCHES/SOAPATCH
export ORACLE_HOME=/d01/Weblogic/FMW/Oracle_SOA1/
export PATH=$ORACLE_HOME/OPatch:$PATH
opatch lsinventory
opatch napply
opatch lsinventory
5. IDM SUite (OID/OVD/ODSM) 11.1.1.7
#xhost
su – weblogic
cd /stage/idmSuite11.1.1.7/Disk1
./runInstaller
Oracle_IDM1
Oracle Internet Directory : Built in C Language, LDAP Server/Directory Server
Oracle Directory Integration Platform : AD <=> OID – Ebiz, OAM – AD, OID, OUD
Oracle Virtual Directory : LDAP Server, Virtualization, Holistic view of data, it never stores data.
Oracle Identity Federation : (FB(ABC Ent- 1,2,3,4..) => ABC Ent(1,2,3,4..))
Oracle HTTP Server : Internally used by OIF and OVD.
Oracle Directory Service Manager : J2EE app to monitor and work on OID/OVD.
Enterprise Manager : Control the OID/OVD.
6. IAMSuite (OIM/OAM) 11.1.2.2
#xhost
su – weblogic
cd /stage/iamSuite11.1.2.2/Disk1
./runInstaller
/stage/jdk1.6.0_35
Oracle_IAM1
Oracle Identity Manager Server : J2EE
Oracle Identity Manager Design Console : Swing based OIM Client
Oracle Identity Manager Remote Manager : Legacy apps, which doesnot support any protocol, this component need to be installed there.
Oracle Access Manager : SSO, Course Grain AuthZ
Oracle Identity Navigator : part of OPAM
Oracle Adaptive Access Manager : Bharosa, banking, Virtual Keyboard, OTP, Device/IP fingerprinting.
Oracle Access Management Mobile and Social : Mobile(ios, android), social(FB, TW, LI, google..)
Oracle Privileged Account Manager : OPAM+OIN, Shared password management utility(DBA, system admins)
Oracle Entitlement Server : Fine Grained AuthZ, Embedded in OIM.
Oracle Security Solutions:
A) Identity Governance Suite
OIM+(OES), OIA, OPAM+OIN
B) Access Management Suite
OAM, OIF, OAAM, eSSO
C) Directory Services Suite
OID, ODSEE, OVD, OUD
D) DB Security
Core DBA
E) Cloud Security
SOA 12c
7. OHS 11.1.1.6/7 #supported webservers for OAM – Apache, iPlanet, IHS, OTD, IIS.
#xhost
su – weblogic
cd /stage/ohs11.1.1.6/Disk1
./runInstaller
Oracle_WT1
Oracle Process Manager Notification (OPMN)
Oracle HTTP Server (OHS)
Oracle Web Cache #not applicable on OAM.
DB <= ApplicationServer <= webserver(static contents from file system)+WebCache(static Contents from cache) <=End User
OBE Webgate Link : http://www.oracle.com/webfolder/technetwork/tutorials/obe/fmw/web_cache/11g/r1/wc_ohs/wc_ohs.htm
Note : Can call it WebTier, OHS Server, Webserver
8. Webgate 11.1.2.2 #Webgates are specific respective webservers,this OHS server Webgate
#xhost
su – weblogic
cd /stage/webgate11.1.2.2/Disk1/
./runInstaller
/stage/jdk1.6.0_35/
Oracle_OAMWebGate11gR2
Note : the Webserver and the respective agent must be in same host and same MW_HOME.
9. OUD 11.1.2.2 (OID-[DB,Replication Tooplogy], ODSEE[applicationServer,UserBase is larger than OID], OVD[DB, WS, LDAP Servers], OUD[Standalone J2EE application, Replication Topology, 1 Billion User Entries, Supports Virtual Profiles(OVD) for DB, LDAP Servers, WS])
#xhost
su – weblogic
cd /stage/OUD_11.1.2/Disk1/
./runInstaller
10. OBIEE – BI Publisher(reporting) #Doc with snapshot
#xhost
su – weblogic
cd /stage/*/Disk1
./runInstaller
Cluster :
=========
2 node cluster setup
Node 1- Node 2
1. All versions must be same.
2. All directory structure, ORACLE_HOME names must be same.
3. TimeStamp must be same on both the nodes. (NTP Server – Time Server , in all nodes, the time is sync from this time server. )
B) Configuration & Integration Phase 2 days
Pre-req : DB and Listener must be started
1. IDMDomain(ODSM) + OID and OVD Instance
#xhost +
#su – weblogic
cd /d01/Weblogic/FMW/Oracle_IDM1/bin
./config.sh
A) Create a domain – IDMDomain(AS, wls_ods1[ODSM]) + oid_ovd_instance1 #Node1 – clustered
B) Extend the existing domain – Add Ons – ODIP, OIF
C) Expand Cluster – In a cluster environment, this option need to be selected on node2
D) Configure without a domain. – oid_ovd_instance1
Note : for port customization of OID/OVD/AS/MS – go to => /stage/idmSuite11.1.1.7/Disk1/stage/Response – staticports.ini , copy it to some other location and modify.
2. Work on ODSM – OID/OVD
How to start the OID/OVD/ODSM Stack :
1. start the DB + Listener
#su – oracle
. oraenv
IDMDB11g
sqlplus ‘/as sysdba’
SQL> startup
SQL> exit
lsnrctl start LISTENER
exit #logout as oracle
su – weblogic
cd /d01/Weblogic/FMW/oid_ovd_instance1/bin
./opmnctl startall/stopall/status/ status -l/ stopproc/startproc ias-component=oid1/ovd1/EMAGENT
#start the AdminServer and ManagedServer
#create boot.properties files , is a one time activity
cd /d01/Weblogic/FMW/user_projects/domains/IDMDomain/servers/AdminServer/security
vi boot.properties
username=weblogic
password=Oracle123
cd /d01/Weblogic/FMW/user_projects/domains/IDMDomain/servers/wls_ods1/security
vi boot.properties
username=weblogic
password=Oracle123
cd /d01/Weblogic/FMW/user_projects/domains/IDMDomain/bin/
nohup ./startWebLogic.sh &
tail -f nohup.out
nohup ./startManagedWebLogic.sh wls_ods1 &
tail -f nohup.out
Alternatively ManagedServers can also be started using Node Manager, FOR THAT start the NodeManager
cd /d01/Weblogic/FMW/wlserver_10.3/server/bin
nohup ./startNodeManager.sh &
Note : Machine status must be reachable, the you can start ManagedServers.
#server states : http://docs.oracle.com/cd/E13222_01/wls/docs81/adminguide/overview_lifecycle.html
3. using ODSM – create adapter in OVD
4. Extend the OID[OUD,AD, ODSEE] Schema – attributes, object classes
A) Extend the OID schema for OIM and OAM
su – weblogic
mkdir -p /stage/scripts
cd /stage/scripts
vi extend.props #OID Specific
IDSTORE_HOST : idm.oraclefusion4all.com
IDSTORE_PORT :3060
IDSTORE_BINDDN: cn=orcladmin
IDSTORE_USERNAMEATTRIBUTE: cn
IDSTORE_LOGINATTRIBUTE: uid
IDSTORE_USERSEARCHBASE: cn=Users,dc=oid,dc=com
IDSTORE_GROUPSEARCHBASE: cn=Groups,dc=oid,dc=com
IDSTORE_SEARCHBASE: dc=oid,dc=com
IDSTORE_SYSTEMIDBASE: cn=systemids,dc=oid,dc=com
export MW_HOME=/d01/Weblogic/FMW/
export JAVA_HOME=/stage/jdk1.6.0_35
export PATH=$JAVA_HOME/bin:$PATH
export ORACLE_HOME=/d01/Weblogic/FMW/Oracle_IAM1
export IDM_HOME=/d01/Weblogic/FMW/Oracle_IDM1
cd /d01/Weblogic/FMW/Oracle_IAM1/idmtools/bin
./idmConfigTool.sh -preConfigIDStore input_file=/stage/scripts/extend.props
B) Create OIM Specific user/group schema in OID #xelsysadm/Oracle123
cd /stage/scripts
vi oim.props
IDSTORE_HOST : idm.oraclefusion4all.com
IDSTORE_PORT : 3060
IDSTORE_BINDDN : cn=orcladmin
IDSTORE_USERNAMEATTRIBUTE: cn
IDSTORE_LOGINATTRIBUTE: uid
IDSTORE_USERSEARCHBASE:cn=Users,dc=oid,dc=com
IDSTORE_GROUPSEARCHBASE: cn=Groups,dc=oid,dc=com
IDSTORE_SEARCHBASE: dc=oid,dc=com
POLICYSTORE_SHARES_IDSTORE: true
IDSTORE_SYSTEMIDBASE: cn=systemids,dc=oid,dc=com
IDSTORE_OIMADMINUSER: oimadmin
IDSTORE_OIMADMINGROUP:OIMAdministrators
cd /d01/Weblogic/FMW/Oracle_IAM1/idmtools/bin
./idmConfigTool.sh -prepareIDStore mode=OIM input_file=/stage/scripts/oim.props
C) Create OAM Specific user/group schema in OID #oamadmin/Oracle123
vi /stage/scripts/preconfigOAMPropertyFile.rsp
IDSTORE_HOST : idm.oraclefusion4all.com
IDSTORE_PORT : 3060
IDSTORE_BINDDN : cn=orcladmin
IDSTORE_USERNAMEATTRIBUTE: cn
IDSTORE_LOGINATTRIBUTE: uid
IDSTORE_USERSEARCHBASE: cn=Users,dc=oid,dc=com
IDSTORE_GROUPSEARCHBASE: cn=Groups,dc=oid,dc=com
IDSTORE_SEARCHBASE: dc=oid,dc=com
IDSTORE_SYSTEMIDBASE: cn=systemids,dc=oid,dc=com
POLICYSTORE_SHARES_IDSTORE: true
OAM11G_IDSTORE_ROLE_SECURITY_ADMIN:OAMAdministrators
IDSTORE_OAMSOFTWAREUSER:oamLDAP
IDSTORE_OAMADMINUSER:oamadmin
cd /d01/Weblogic/FMW/Oracle_IAM1/idmtools/bin
./idmConfigTool.sh -prepareIDStore mode=OAM input_file=/stage/scripts/preconfigOAMPropertyFile.rsp
Checkpoint : OID can be integrated via OVD with OIM and OAM.
5. IAMDomain(AdminServer, oim_server1 , oam_server1, soa_server1)
pre-req : DB + Listener
#xhost +
su – weblogic
cd /d01/Weblogic/FMW/oracle_common/common/bin
./config.sh
OIM/OAM #soa_server1 will be selected will be selected automatically.
Note : Never ever try to start AdminServer and ManagedServers. #AS/MS ==> OPSS(Nothing) ==> Fail.
6. Upgrade the OPSS schema #specific to PS2 11.1.2.2
su – weblogic
cd /d01/Weblogic/FMW/oracle_common/bin
./psa
7. Create DB Security
Checkpoint : Now we can start AdminServer and ManagedServers.
cd /d01/Weblogic/FMW/oracle_common/common/bin
./wlst.sh /d01/Weblogic/FMW/Oracle_IAM1/common/tools/configureSecurityStore.py -d /d01/Weblogic/FMW/user_projects/domains/IAMDomain/ -c IAM -m create -p <OPSS Schema Password>
AS/MS ==> OPSS(Internal Audit Store + Credential Store) ==> Success.
Troubleshoot : Validate the DB Security Store : ./wlst.sh /d01/Weblogic/FMW/Oracle_IAM1/common/tools/configureSecurityStore.py -d /d01/Weblogic/FMW/user_projects/domains/IAMDomain/ -c IAM -m validate
Checkpoint : Now AdminServer and ManagedServers of IAM can be started.
Create boot.properties files for IAMDomain.
mkdir -p /d01/Weblogic/FMW/user_projects/domains/IAMDomain/servers/AdminServer/security
mkdir -p /d01/Weblogic/FMW/user_projects/domains/IAMDomain/servers/soa_server1/security
mkdir -p /d01/Weblogic/FMW/user_projects/domains/IAMDomain/servers/oim_server1/security
mkdir -p /d01/Weblogic/FMW/user_projects/domains/IAMDomain/servers/oam_server1/security
cd /d01/Weblogic/FMW/user_projects/domains/IAMDomain/servers/AdminServer/security
vi boot.properties
username=weblogic
password=Oracle123
copy the file to all managedservers security folders.
8. Start Servers(DB, Listener, oid_ovd_instance1, AdminServer, soa_server1) – server life cycle
cd /d01/Weblogic/FMW/user_projects/domains/IAMDomain/bin
nohup ./startWebLogic.sh &
nohup ./startManagedWebLogic.sh soa_server1 &
9. configure the OIM – LDAP Sync
su – weblogic
cd /d01/Weblogic/FMW/Oracle_IAM1/bin
./config.sh
Note : Instead ODSM, use LDAP Browser – http://jxplorer.org/downloads/users.html
cd /d01/Weblogic/FMW/user_projects/domains/IAMDomain/bin
nohup ./startManagedWebLogic.sh oim_server1 &
===>
C) OIM Administration –
1. Consoles :
A) OIM
1. Identity Self Service #All enterprise users(2000)
http://idm.luckyfusion.com:14000/oim or http://idm.luckyfusion.com:14000/identity
xelsysadm/Oracle123
2. Sysadmin Console #only System Administrator Role members are allowed to access this console
http://idm.luckyfusion.com:14000/sysadmin
xelsysadm/Oracle123
3. Design Console #Swing Based OIM Client
Configure :
xhost +
su – weblogic
cd /d01/Weblogic/FMW/wlserver_10.3/server/lib
export JAVA_HOME=/stage/jdk1.6.0_35/
export PATH=$JAVA_HOME/bin:$PATH
java -jar wljarbuilder.jar
=> it will generate wlfullclient.jar file and that jar need to be copied to /d01/Weblogic/FMW/Oracle_IAM1/designconsole/ext
cp wlfullclient.jar /d01/Weblogic/FMW/Oracle_IAM1/designconsole/ext/
==
cd /d01/Weblogic/FMW/Oracle_IAM1/designconsole/
./xlclient.sh
B) SOA
1. BPM Worklist App Console #Nothing but OIM INBOX
http://idm.luckyfusion.com:8001/integration/worklistapp
2. SOA-INFRA Console #to observe deployed composites.
http://idm.luckyfusion.com:8001/soa-infra/
weblogic/Oracle123
3. SOA Composer Console #Modify Business Rule of Disconnected Resources(OIM)
http://idm.luckyfusion.com:8001/soa/composer
weblogic/Oracle123
2. LDAP Sync #only needed for SSO purposes.
Use case : HRMS(2000)===> {OIM(2000) <===> OID/OVD[2000]} <== OAM
What : All OIM Users, Roles, User membership to Roles, Role Hierarchy, New user registration will sync in to OID/OVD automatically.
How & Troubleshoot :
Login to sysadmin console => Click On IT Resource => “Directory Server”
3. Bulk Load Utility :
(Users, Roles, Role Categories, Role Membership, Role Hierarchy, Account) from .csv or DB table.
su – weblogic
cd /d01/Weblogic/FMW/Oracle_IAM1/server/db/oim/oracle/Utilities/oimbulkload
prepare csv files
export JAVA_HOME=/stage/jdk1.6.0_35/
export PATH=$JAVA_HOME/bin:$PATH
cd /d01/Weblogic/FMW/Oracle_IAM1/server/db/oim/oracle/Utilities/oimbulkload/scripts
./oim_blkld.sh
=> ORACLE_HOME : /u01/app/oracle/product/11.2.0/dbhome_1/
=> //idm.oraclefusion4all.com:1521/IDMDB11g
=> DEV_OIM
ROLE_CATEGORY_NAME
Q&A
Users ==> Trusted Recon, BLKLD
4. Create trusted app and target app # independent activity, in real time that is not expected.
A) OUD Instance 1(Trusted App – 2000 Users)
su – weblogic
cd /d01/Weblogic/FMW/Oracle_OUD1/
export JAVA_HOME=/stage/jdk1.6.0_35/
export PATH=$JAVA_HOME/bin:$PATH
./oud-setup
#asinst_1
idm.oraclefusion4all.com
1389
cn=Directory Manager
Oracle123
dc=trusted,dc=com
Users : 2000
B) OUD Instance 2 (Target App – 0 User)
#asinst_2
idm.oraclefusion4all.com
2389
cn=Directory Manager
Oracle123
dc=target,dc=com
Users : 0
Checkpoint : Trusted and Target is there now for OIM.
Discussion on Connector Bundle and identity the right connector(ldap):
5. Install the right connector
http://idm.luckyfusion.com:14000/sysadmin
xelsysadm/Oracle123
Note : Make sure, before installation, copy the connector to ConnectorDefaultDirectory
Copy the connector bundle(OID-11.1.1.6.0) to /d01/Weblogic/FMW/Oracle_IAM1/server/ConnectorDefaultDirectory
Manage Connector => Install => Select the connector and click on load and continue :
– Configuration of Connector Libraries
– Import of Connector XML Files (Using Deployment Manager)
– Compilation of Adapter Definitions
6. Create IT Resources (Connection object to target App[s] and trusted application)
http://idm.luckyfusion.com:14000/sysadmin
xelsysadm/Oracle123
IT Resource :
A) TrustedAppITRes
baseContexts : “dc=trusted,dc=com”
Configuration Lookup : Lookup.LDAP.OUD.Configuration.Trusted
Connector Server Name :
credentials : Oracle123
failover :
host : idm.oraclefusion4all.com
port : 1389
principal : cn=Directory Manager
ssl : false
B) TargetAppITRes
baseContexts : “dc=target,dc=com”
Configuration Lookup : Lookup.LDAP.OUD.Configuration
Connector Server Name :
credentials : Oracle123
failover :
host : idm.oraclefusion4all.com
port : 2389
principal : cn=Directory Manager
ssl : false
7. Trusted Reconciliation
pre-req : Install the right connector and create IT Resource to connect to trusted app i.e. HRMS System.
HR People : Create, Delete, Modify – Horizontal or vertical
http://idm.luckyfusion.com:14000/sysadmin
Scheduler => *trusted*
1. LDAP Connector Trusted User Reconciliation (TrustedAppITRes) #Create/Modify
2. LDAP Connector Trusted User Delete Reconciliation (TrustedAppITRes) #Delete-3/Rogue User
8. Provisioning Configuration
Create/delete/modify/enable/disable
A) Idenity the target application, install the connector, create IT Resource
http://idm.luckyfusion.com:14000/sysadmin/
xelsysadm/Oracle123
B) Create Sandbox
C) Create Application Instance – Collection of Resource Object and IT Resource.
D) Create Object Form using Form Designer and create Application Instance.
E) Publish the sandbox
F) Create lookup configuration
Scheduler = “LDAP Connector OU Lookup Reconciliation”()
9. Direct Provisioning
Use Case :
Only System Administrator – Ad-hoc
10. Auto/Criteria Based provisioning
Use Case : Email Server
Use Case : Any User[s](Org – Finance and/or Country = US) ==> Target App[s]
Steps :
1. Create a Role
2. membership rule on top of the role
3. Create Access Policy(Combination of Role[s] and Resource[s])
Login to http://idm.luckyfusion.com:14000/sysadmin
xelsysadm/Oracle123
Access Policies => Create Access Policy
Note : “Evaluate User Policies” Job runs after each 10 mins, so either wait or run it.
4. Observe the Auto/Criteria provisioning
11. Request Based Provisioning
e.g. Training
Entities :
1. Requester
2. Catalog Items
3. Beneficiary
4. Request level management = Beneficiary’s Management Line
5. Operational level Management = Catalog Item Approver’s Management Line
6. Route Slip – if any of the approver is not active then task will be assigned to weblogic for corrective actions.
SOA : 2 soa composites
1) Request level approval : Beneficiary’s Management Line
2) Operational Level Approval : Catalog Item Approver’s Management Line
OIM :
http://idm.luckyfusion.com:14000/sysadmin
Approval Policies =
Create 2 approval policies
note : based on each request type, create request level and operational level AP.
1) Request level approval :
2) Operational Level Approval
Life Cycle –
12. Auto provisioning with Request based provisioning
Use Case : User(US,Finance) => Unless Manager approves => OUD Target.
A) Modify the access policy – With Approval = Yes
B) Create 2 set of Approval Policies
request type : Access Policy Based Application Instance Provisioning.
Life Cycle :
13. Proxy :
Manager is on leave 15 days
Restriction :
A) No date overlap in multiple proxies
B) A proxy can not set another user as proxy for the specified dates.
14. Target Reconciliation #update process form associated with the account.
Update the process form with modified information of the target.
http://idm.luckyfusion.com:14000/sysadmin
Scheduler =:
“LDAP Connector User Search Reconciliation” – create/modify
“LDAP Connector User Search Delete Reconciliation” – delete
15. Disconnected Application Instance or Disconnected Resources
Use Case : H/W Devices, e.g. – Server Room Biometric Card
Combination of request based provisioning + Disconnected Workflow
Practical Steps :
A) Create Sandbox
B) Create Disconnected Application Instance
C) Modify the object form for additional attributes specific to H/W Device
D) Publish the sandbox
Optionally create 2 set of approval policies for request type “Provision to Application Instance”
E) Modify the business rule for Fulfillment user/role details using SOA Composer.
http://idm.luckyfusion.com:8001/soa/composer
weblogic/Oracle123
modify the business rule for disconnected composite.
Life Cycle of disconnected resource.
Entitlement Configuration :
Group, responsibility on target application.
==
On target app : Create groups
Step 1.
cd /stage/scripts
vi OUD_TargetEntitlement.ldif
dn: cn=Groups,dc=target,dc=com
cn: Groups
objectClass: top
objectClass: orclContainer
dn: cn=Accounts Payable Administrator,cn=Groups,dc=target,dc=com
cn: staticGroup
objectClass: top
objectClass: groupOfUniqueNames
uniquemember: cn=USER.1000,ou=People,dc=target,dc=com
dn: cn=Accounts Payable User,cn=Groups,dc=target,dc=com
cn: staticGroup
objectClass: top
objectClass: groupOfUniqueNames
uniquemember: cn=USER.1000,ou=People,dc=target,dc=com
dn: cn=BI Publisher Users,cn=Groups,dc=target,dc=com
cn: staticGroup
objectClass: top
objectClass: groupOfUniqueNames
uniquemember: cn=USER.1000,ou=People,dc=target,dc=com
dn: cn=San Francisco Users,cn=Groups,dc=target,dc=com
cn: staticGroup
objectClass: top
objectClass: groupOfUniqueNames
uniquemember: cn=USER.1000,ou=People,dc=target,dc=com
Step 2. Create groups in OUD, using LDIF file
cd /d01/Weblogic/FMW/asinst_2/OUD/bin
./ldapmodify -a -h idm.oraclefusion4all.com -p 2389 -D “cn=Directory Manager” -q -f /stage/scripts/OUD_TargetEntitlement.ldif
==
http://idm.luckyfusion.com:14000/sysadmin/
xelsysadm/Oracle123
Scheduler = “LDAP Connector Group Lookup Reconciliation[TargetAppITRes]”
Entitlement Assignments
Entitlement List
Entitlement Post Delete Processing Job
==
Oragnization Security :
==
Review System : after provisionig is done then after 3/6/9/12 months, you need to review access to critical resources – regulatory compliances.
A) Attestation – 9i
http://idm.luckyfusion.com:14000/sysadmin
xelsysadm/Oracle123
Attestation Configuration => Create Attestation process
Range of Users, having range of Resources(Roles and Resource Objects), schedule, reviewers, Process Owner.
Life Cycle : ?
B) Certification – 11gR2 PS1, PS2, …PS3
Features : Multi Phase Certification, Closed Looped Remediation(PS2, BP03), Offline Certification, Event Listeners etc.
Enable :
http://idm.oraclefusion4all.com:14000/sysadmin
xelsysadm/Oracle123
System Configuration => “Display Certification or Attestation”
Value : Attestation or Certification or Both
Restart only OIM and observe certification will be enabled.
Use Case :
1. Certifiers : Managers or any other user, Org Certifier, Catalog Item Level Certifier
2. Risk Level : High/Medium/Low
3. Cert Def – Cert_UserHavingFinanceorgCertDef
==
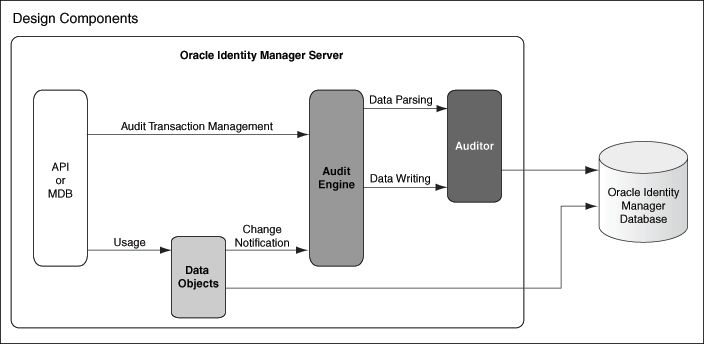
OIM Auditing :
How : http://docs.oracle.com/cd/E40329_01/admin.1112/e27149/img/component.gif
Level :
1. Process Task: Audits the entire user profile snapshot together with the resource lifecycle process.
2. Resource Form: Audits user record, role membership, resource provisioned, and any form data associated to the resource.
3. Resource: Audits the user record, role membership, and resource provisioning.
4. Membership: Only audits the user record and role membership.
5. Core: Only audits the user record.
6. None: No audit is stored.
http://idm.oraclefusion4all.com:14000/sysadmin
xelsysadm/Oracle123
System Configuration => “User profile audit data collection level – None/Core/Membership/Resource/Resource Form/Process Task”
==
OIM integration with BI Publisher :
Objective : Audit Reports => templates, data
OIM Node :
1) templates :
cd /d01/Weblogic/FMW/Oracle_IAM1/server/reports
ls
oim_product_BIP11gReports_11_1_2_2_0.zip
2) Copy the oim_product_BIP11gReports_11_1_2_2_0.zip to BI Publisher node
scp oim_product_BIP11gReports_11_1_2_2_0.zip weblogic@bi:/tmp
BI Publisher Node :
http://bi.raje.com:9704/xmlpserver/
weblogic/Oracle123
Catalog => There is no oim report templates are listed
1) Get the report templates
A) Unzip the reports zip file
unzip -d /d01/weblogic/FMW/user_projects/domains/bifoundation_domain/config/bipublisher/repository/Reports/ /tmp/oim_product_BIP11gReports_11_1_2_2_0.zip
B) Run the job
http://bi.raje.com:9704/xmlpserver/
weblogic/Oracle123
Administration => Server Configuration
Note : Make sure “BI Publisher repository” points before Reports folder.
Click On “Upload to BI Presentation Catalog”
2) Populate report templates with data
http://bi.luckyfusion.com:9704/xmlpserver/
weblogic/Oracle123
Administration => JDBC Connection => Add Data Source
A) “OIM JDBC” => DEV_OIM
B) “BPEL JDBC” => DEV_SOAINFRA
=====================
Note : In case, data is not populated in the reports :
Run the job
http://bi.luckyfusion.com:9704/xmlpserver/
weblogic/Oracle123
Administration => Server Configuration
Note : Make sure “BI Publisher repository” points before Reports folder.
Click On “Upload to BI Presentation Catalog”
=====================
3) Observe the OIM Audit Reports with data
===
Code Migration:
1. Deployment Manager : Export/Import – .xml
2. Sandbox – Form Data , UDF Changes, UI Change – .zip
Notification Templates :
D) OAM Administration
==
HRMS(2000 – create/delete/modify) ==> OIM[2000] == OVD[OID] <= OAM
Thanks & Regards
Lakshmi Prasada Reddy Nandyala
No comments:
Post a Comment